
Hi all! I have a quick and fun project to share today. The Eileen Hull Inspiration Team has been sharing unexpected ways of using Eileen's Sizzix products this month. I love to use my dies in ways they weren't originally meant to be used and had such fun with this project. It is is also a great way to get even more use out of your dies.

The fidget spinner craze reached our house at the beginning of the summer and Anton loves his spinners. As I was looking at the House Pocket die from the Heartfelt collection, I got the idea of turning it into a little bag and it was just the right size as a case for a fidget spinner. It is very easy to make this bag out of felt, but you can also try other materials. Even the little fidget spinners were made with a die, as you will see below. Now, Anton can keep a spinner in his backpack or pocket without worrying about it getting scratched.
Lots of other things could be stored in this little bag too, and you can use it as a little gift bag. It would be perfect, for instance, for a necklace or another small gift. Or for a gift card. The bag is 4.3 x 3.3 in. Let's start with the simple steps for how to make this fidget spinner case.

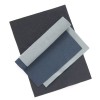
Start by die cutting one full house shape and one shorter shape from thick felt. I used felt by Kunin. Leave a little flap at the top of the blue shape.

Fold down the flap and stitch. You can match up the thread if you want to, but I decided to go with contrasting black. I also glued a ruler cut from Tim Holtz's Eclectic Elements fabric and stitched that down too (when the glue was dry).
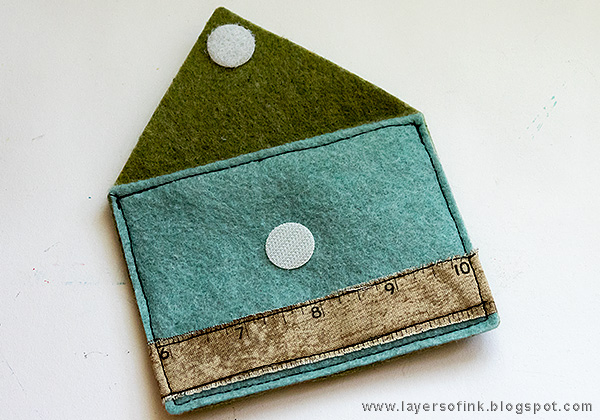
Place the blue square on top of the house shape and stitch around the edges. Add Velcro for a closure.

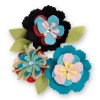
I was wondering how to embellish the bag, and when I looked at the flowers in Eileen Stitchy Flowers & Leaf set, I realized that one of them could easily be turned into a fidget spinner, by simply cutting off every second petal.

Glue the spinners to the bag with matte medium and add a gem to the center. The black and teal felt is wool felt by Simon Says Stamp.
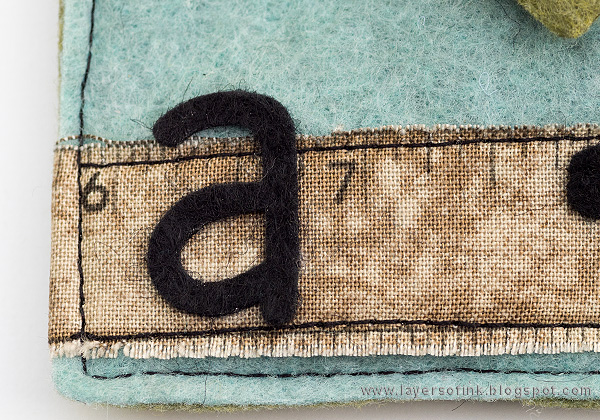
I also die cut the first letter of his name from black felt, using Eileen's Homemade Alphabet die. You could of course also die cut the recipient's full name.

Anton likes his little bag and already has ideas for more bags.

Instead of decorating with fidget spinners, you can use the full flower, or maybe a bird or a butterfly, from Eileen's Birds & Butterfly set. For a more traditional use of the House Pocket die, check out this House card of mine.

There is still time to join Sizzix Eileen Hull Maker Challenge, focusing on the House Pocket die.
I hope this post inspired you to look at your dies with new eyes, since most dies can be used for so much more than what you see on the packaging.
Happy crafting!!
Anna-Karin
Supplies:
Felt: Kunin Eco-Fi Plus and Eco-Fi Classic


Awesome idea. Love the dies you used and how you created this awesome project.
ReplyDeleteAnton's spinner bag is fabulous Anna-Karin! How clever of you to create the spinner shape from the flower too - so inspired! Anne x
ReplyDeleteWhat a brilliant idea to alter a flower die-cut to make a fidget spinner! Your fidget spinner case is very stylish! I love the colours of your chosen felts! My daughter was mad about the fidget spinners too but now she doesn't pay any attention to them! Her spinners just collect the dust on her shelves! LOL
ReplyDeleteWhat an awesome idea Anna-Karin. I am totally inspired by your creativity to try my dies in new ways. My daughter is a jewellery designer and these would make unique pouches to present her pieces in to clients. Thanks for sharing this!
ReplyDeleteYou have the amazing and wonderful talent for looking at something and seeing something completely different. Love how you used a simple house shape and little flower and came up with this cute little treasure. You have a lucky little boy there to have such a great Mom! Thank you for sharing your fun designs!
ReplyDeleteAwesome idea Anna-Karin and perfect use of the flower diecut to make a spinner from too! <3
ReplyDelete